

Architecture#
The browser connects directly to voice.pinecall.io over WebRTC. Your backend's only job is minting short-lived tokens.
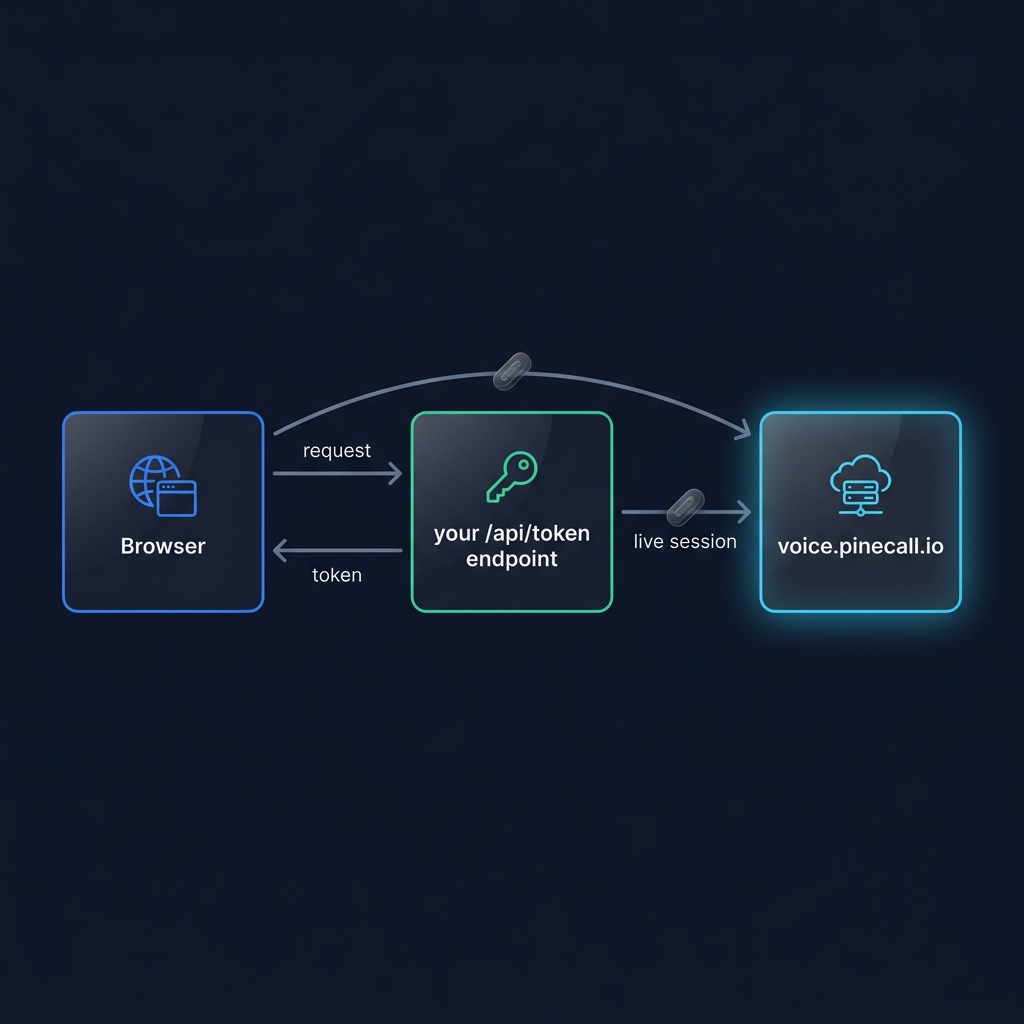
Your backend never proxies audio. The audio path is browser ↔ voice server, peer-to-peer over WebRTC.
1. Create the agent#
WebRTC works automatically for any agent — no channel declaration needed.
import { Pinecall } from "@pinecall/sdk";

const pc = new Pinecall({ apiKey: process.env.PINECALL_API_KEY! });

const mara = pc.agent("mara", {
  prompt: "You are Mara. Be concise and warm.",
  llm: "openai/gpt-5.4-nano",
  voice: "elevenlabs/sarah",
  stt: "deepgram/flux",
  language: "es",
});

mara.on("call.started", (call) => call.say("¡Hola!"));
2. Mint tokens from your backend#
Your token endpoint should be behind your existing auth (session cookie, JWT, OAuth — whatever you use). The endpoint calls createToken() and returns the result.
// Express
app.get("/api/token", authMiddleware, async (req, res) => {
  const token = await mara.createToken("webrtc");
  res.json(token);
});
// Next.js App Router
export async function GET() {
const session = await getSession();
if (!session) return new Response("Unauthorized", { status: 401 });
const token = await mara.createToken("webrtc");
return Response.json(token);
}The response shape:
{
  "token": "wrtc_abc123...",
  "server": "wss://voice.pinecall.io",
  "expiresIn": 60
}
Tokens are single-use, scoped to the agent, and expire in 60 seconds. See Security for the full security model.
Sealed session metadata (trusted context)#
Your token endpoint already knows who the user is — it's behind your auth. Bake that
identity into the token by passing a metadata object as the last argument to
createToken. It's sealed into the signed token on your server, so the browser
cannot forge or change it:
app.get("/api/token", authMiddleware, async (req, res) => {
  const token = await mara.createToken("webrtc", {
    userId: req.user.id,
    plan: req.user.plan,
    tenantId: req.user.orgId,
  });
  res.json(token);
});
It surfaces — trusted — as call.metadata in your agent:
agent.on("call.started", (call) => {
  console.log(call.metadata.userId, call.metadata.plan); // straight from the sealed token
});
The same applies to chat tokens — mint with createToken("chat", { ... }) and read
call.metadata in the chat session. (With the Pinecall client instead of an Agent
instance, it's pc.createToken("webrtc", "mara", { ... }).)
Trusted vs client-supplied. The widget also accepts a
metadataprop set in the browser — handy, but a user can forge it. For anything you'll act on (identity, plan, entitlements, tenant), seal it in the token here instead of trusting the client prop.
3. Drop in the widget#
npm install @pinecall/webimport { VoiceWidget } from "@pinecall/web";
export default function App() {
return (
<VoiceWidget
agent="mara"
tokenProvider={async () => {
const res = await fetch("/api/token", { credentials: "include" });
return res.json();
}}
/>
);
}That's the entire frontend. Click the orb, talk, listen.
Listening for events in the browser#
Events arrive over the WebRTC DataChannel — you don't need SSE for in-browser UIs. The widget renders its own transcript, and exposes session status plus the full live state via the useVoice() hook:
import { VoiceWidget, useVoice } from "@pinecall/web";

function Transcript() {
  const { messages, status } = useVoice();
  return messages.map((m) => <p key={m.id}>{m.role}: {m.text}</p>);
}

export default function App() {
  return (
    <VoiceWidget
      agent="mara"
      tokenProvider={getToken}
      onStatusChange={(status) => console.log("Status:", status)}
    >
      <Transcript />
    </VoiceWidget>
  );
}
For lower-level control, use @pinecall/web/core directly — it gives you the raw event stream.
Custom UI without the widget#
If the widget doesn't fit your design, build your own UI with @pinecall/web/core:
import { VoiceSession } from "@pinecall/web/core";

const session = new VoiceSession({
  agent: "mara",
  // Fetch the token from your backend instead of hitting the voice server directly
  tokenProvider: () => fetch("/api/token").then((r) => r.json()),
});

// Re-render whenever the session state changes (messages, status, phase, …)
session.subscribe(() => {
  const { status, messages } = session.getState();
  console.log("Status:", status, "Last:", messages.at(-1)?.text);
});

// connect() fetches the token (via tokenProvider) and negotiates WebRTC
await session.connect();

// User clicks "End"
session.disconnect();
Skipping the backend for demos#
For pure demos or prototypes — no backend, no auth — you can opt in to public token access using allowedOrigins:
const demo = pc.agent("demo-bot", {
  // ...config
  allowedOrigins: [
    "https://demo.mysite.com",
    "https://*.mysite.com",
    "http://localhost:*",
  ],
});
Then the widget can fetch tokens directly from the voice server, no backend needed — omit tokenProvider and it hits /webrtc/token directly:
<VoiceWidget agent="demo-bot" />Warning:
allowedOriginsprotects against casual embedding but not against a determined attacker (Origin headers can be spoofed from scripts/curl). For production, always usetokenProviderwith your backend's auth. See Security.
Chat channel (text only)#
Same pattern, different token type. Chat gives you typed conversations without audio:
// Backend
app.get("/api/chat-token", authMiddleware, async (req, res) => {
  const token = await agent.createToken("chat");
  res.json(token);
});
Connect from the browser via WebSocket:
const ws = new WebSocket(`${server}/ws?token=${token}`);
ws.onmessage = (e) => {
  const event = JSON.parse(e.data);
  if (event.event === "chat.token") appendBotToken(event.text);   // streaming token
  if (event.event === "chat.done") finishBotMessage(event.text);  // final text
};
ws.send(JSON.stringify({ event: "message", text: "Hello" }));
What's next#
- Security — the full token security model
- Multi-tenant — scope tokens per user/tenant
- Dev mode — slug-based isolation lets every dev have their own agent